Hyper-v如何用桥接方式上网并通过NAT做端口映射

在HYPER-V环境下,虚拟机和宿主机在不同的IP网段情况下实现上网。具体步骤如下:

1.在【设备管理器】添加一个新硬件设备

1 

2.手动从列表中选择

3

3.添加一个网络适配器

4

4.选择Microsoft 环回适配器

5

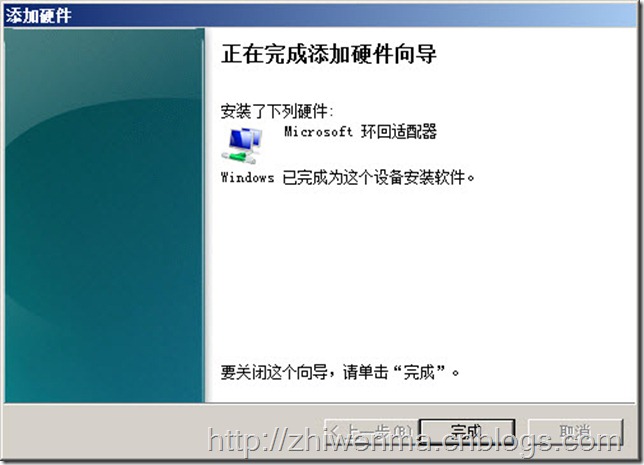
5.硬件添加完成

7

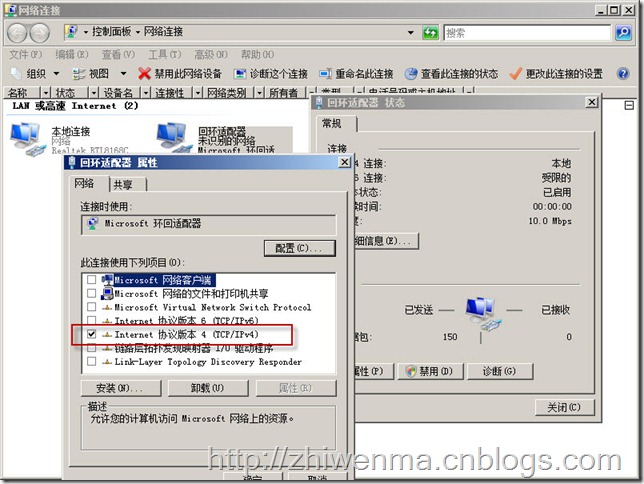
6.在【网络连接】中,把新增加的网络适配器修改属性,只选择IPV4

9

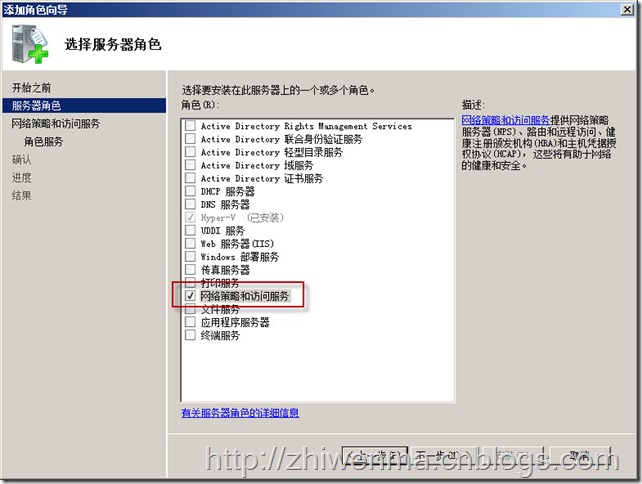
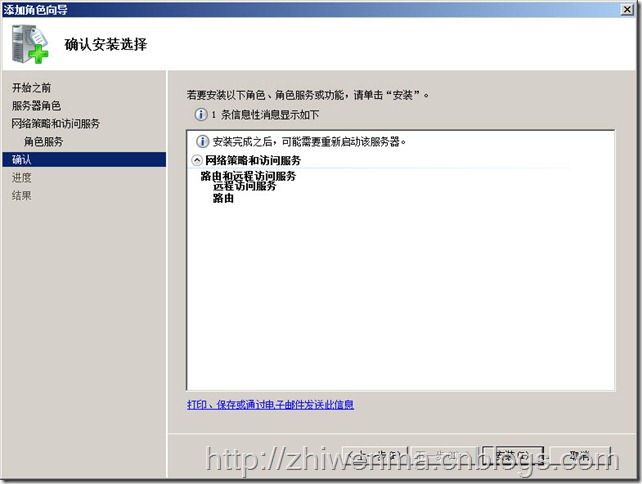
7.安装【网络策略和访问服务】

10

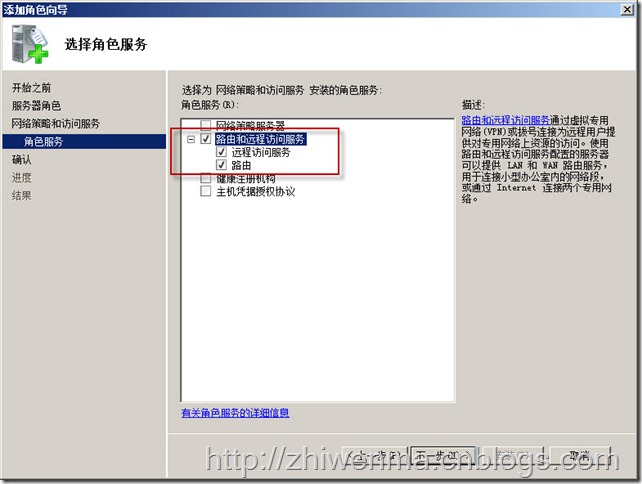
8.选择【路由和远程访问服务】

12

9.完成

13

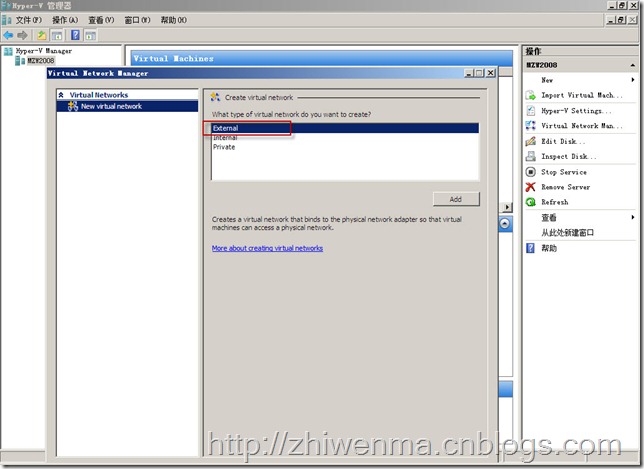
10.在HYPER-V中添加一块网卡

15

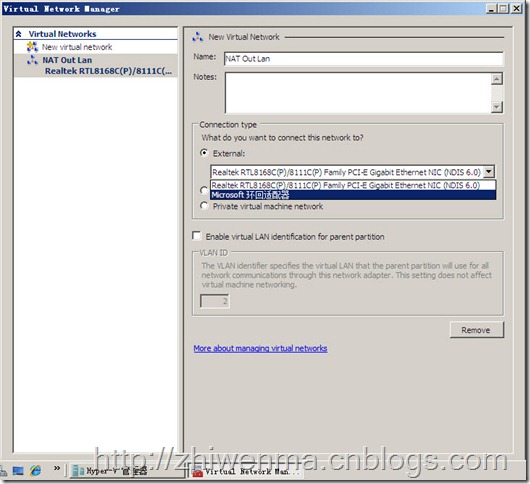
11.选择之前新建的【Microsoft 环回适配器】

16

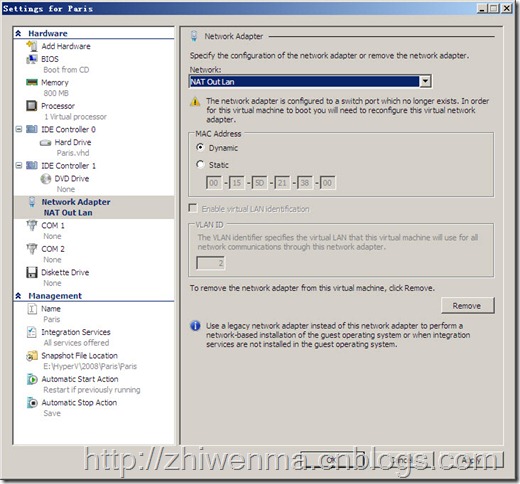
12.为虚拟机分配网卡

17

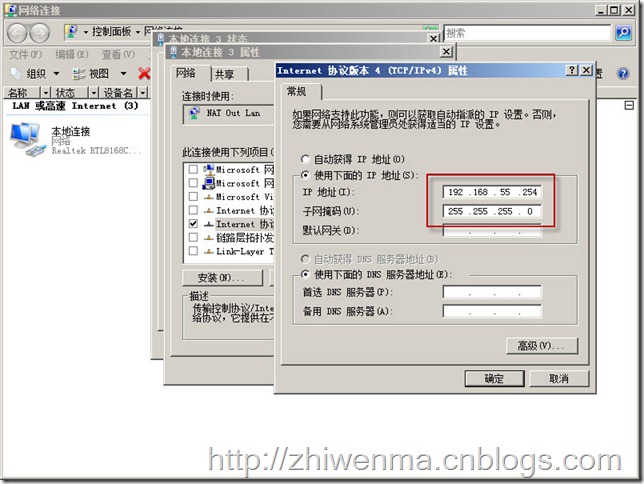
13.在你新建好HYPER-V网卡后,默认宿主机会在多一个网络适配器出来,我这里是【本地连接3】,为其配置虚拟机新网段网关

18

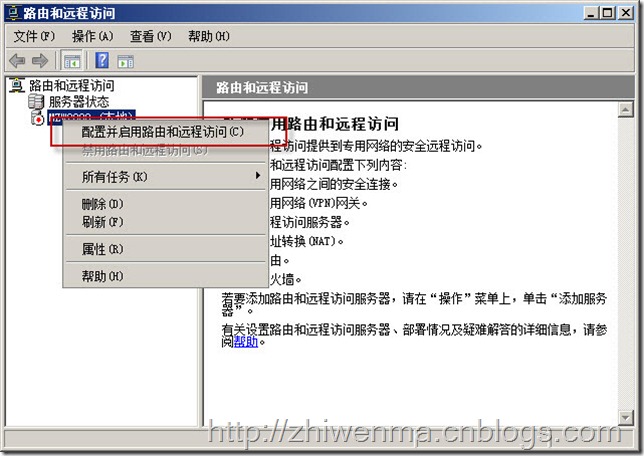
14.配置并启用路由和远程访问

21

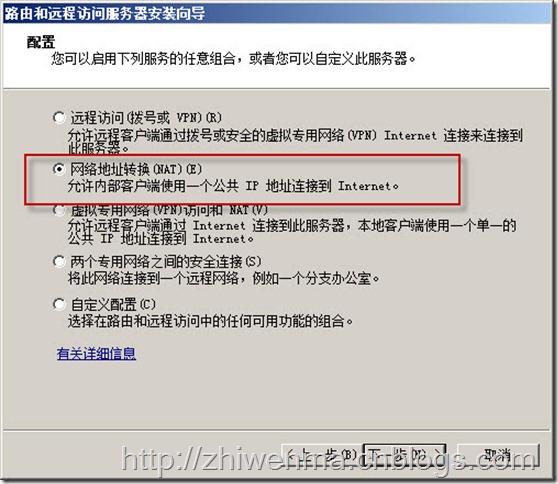
15.选择【网络地址转换】

23

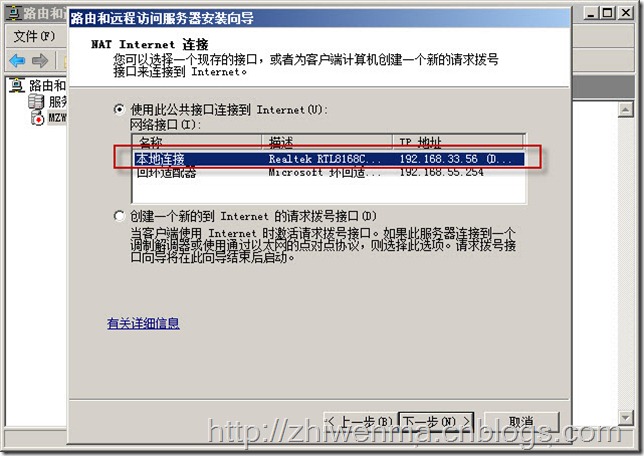
16.为NAT选择公共网络接口

24

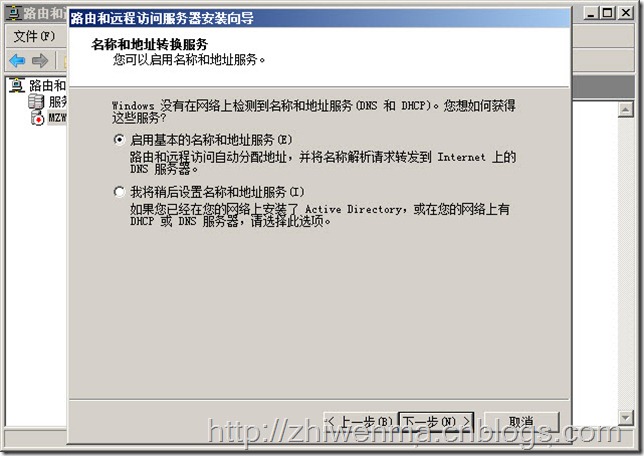
17.启用基本的名称和地址服务

25

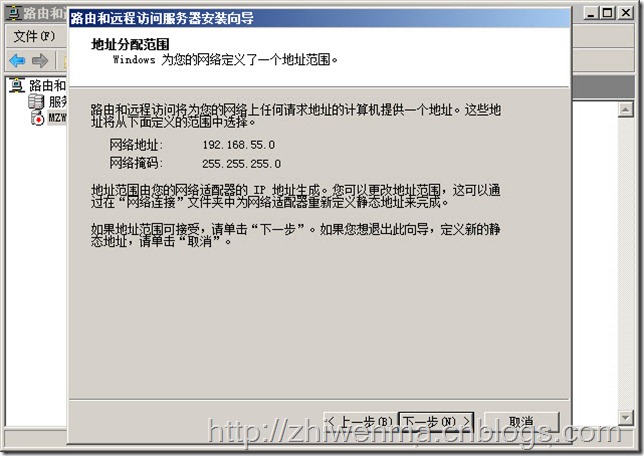
18.下一步

26

19.完成

27

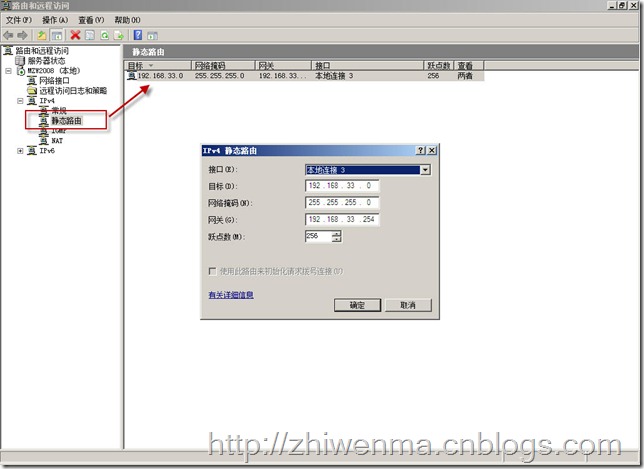
20.为了让Hyper-V中虚拟机能在192.168.55.0网段中能够上网,要新建一个静态路由,参考如下

29

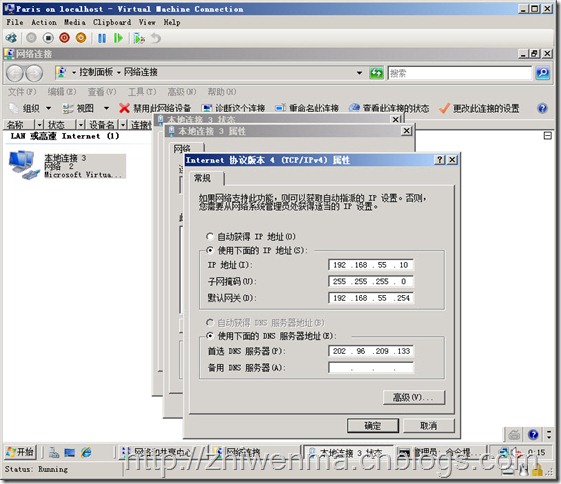
21.接下来配置虚拟机中的客户端IP

30

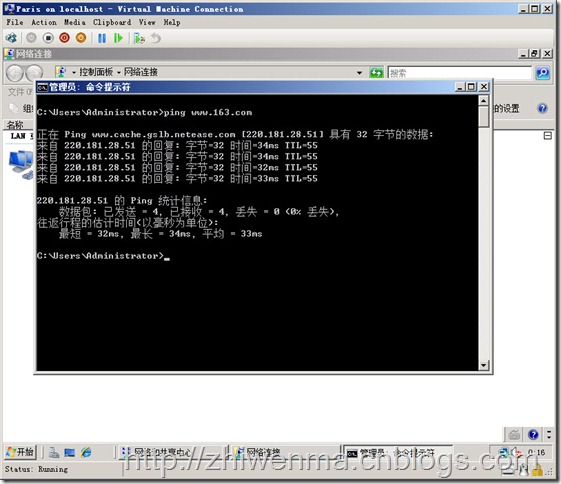
22.OK成功实现访问

31

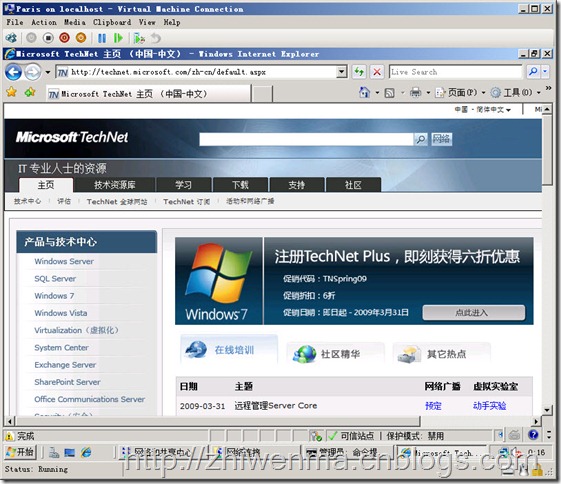
23.成功游览TechNet网站

32

完成!!

————————————————

windows server 2003通过路由与远程访问服务实现NAT代理内部电脑上网,同时我们通过端口映射来向外发布服务器提供服务.

一.NAT的实现
打开管理工具——路由与远程访问,在计算机名节点上右击,选择”配置并启用路由和远程访问”

在下一步中选择”网络地址转换”

后续选择连接到internet的网卡,点击下一步,后续按照默认操作向导完成即可.

二.完成NAT后,在路由与远程访问控制台中展开计算机名/IP路由选择/NAT基本防火墙,在连接到internet的网卡上右击,选择属性

切换到服务和端口标签,选择需要进行端口映射的服务,点击编辑,输入内部计算机中提供该服务的IP地址即可

完成即可实现在路由和远程访问的NAT模式中实现端口映射了.

注意:如果需要的服务非常规服务,列表中不存在我们可以手动创建,在编辑端口映射窗口中有一个”公用地址”,如果连接internet的网卡上有绑定多个IP,我们可以在属性窗口的地址池标签中设置好对应地址,然后在该”功用地址”中设置对应地址即可.这样就可以完美实现”路由和远程访问”NAT模式下的端口映射了!

——————

微软官方关于HYPER-V NAT的视频:

http://technet.microsoft.com/en-us/windowsserver/dd430329.aspx

“Could not instantiate mail function” and “Value does not fall within the expected range” troubleshooting

The reason I wrote this article in English is that all these problems occured in English environment. You can reprint this article freely as long as you link back to http://www.techmemo.net/704.html/

These problems have bothered me for almost a whole day, and I finally got everything fixed now.

I ran into the error early this morning when I answered one of my clients’ ticket in WHMCS, the mail didn’t got through, it gave me an “Email Sending Failed – Could not instantiate mail function” error, I searched google for a few hours but none of them were really helping. So I decided to troubleshoot this by myself.

I started with checking Plesk’s mail system, well, another weired problem occured, I couldn’t start the website of Horde webmail. It gave me this error: “Value does not fall within the expected range”, I searched google again, but still nothing helped. I felt rather anoyed, I have been held up for almost a day trying to troubleshoot this. But when nothing can help me, I should help myself.

So I installed hMailServer and try to use AtMail instead, but again, I couldn’t start the website of AtMail webmail. Frustrated as I was, I had to find a solution. So I thought maybe there was a binding problem. And there was! One of my client was using Chinese domain name, but the binding was using Puny code, and IIS7.5/IIS7 don’t support Puny code, you should just input Chinese characters instead. So I did, and it worked!

Ok, the mail server part is solved, now I must handle the mail sending issue. At first I had no idea where to start. Then I decided to log SMTP activity, and I found those:

“SMTPD” 4244 38 “2010-08-14 17:45:49.968” “127.0.0.1” “SENT: 220 shawnidc.com ESMTP”
“SMTPD” 5468 38 “2010-08-14 17:45:49.984” “127.0.0.1” “RECEIVED: HELO ShawnIDC”
“SMTPD” 5468 38 “2010-08-14 17:45:49.984” “127.0.0.1” “SENT: 250 Hello.”
“SMTPD” 4244 38 “2010-08-14 17:45:49.984” “127.0.0.1” “RECEIVED: MAIL FROM:<[email protected]>”
“SMTPD” 4244 38 “2010-08-14 17:45:49.984” “127.0.0.1” “SENT: 250 OK”
“SMTPD” 4244 38 “2010-08-14 17:45:49.984” “127.0.0.1” “RECEIVED: RCPT TO:<[email protected]>”
“SMTPD” 4244 38 “2010-08-14 17:45:49.984” “127.0.0.1” “SENT: 550 Unknown user”

“SMTPD” 4244 38 “2010-08-14 17:45:50.000” “127.0.0.1” “RECEIVED: QUIT”
“SMTPD” 4244 38 “2010-08-14 17:45:50.000” “127.0.0.1” “SENT: 221 goodbye”

Ok, finally I figured out what was going on, the mail [email protected] is using his own mail server, ie. the MX record didn’t point to my server, but hMailServer still takes yyy.com as a local mail system.

So here is the solution. Check the log to find out which mail is not working and then delete the mail server record in hMailServer.

Finally, everything is working now. Hope my article could help you a bit! Please comment on this if you still have any questions.

IIS7/IIS7.5中绑定中文域名

刚刚发现有个客户绑定的中文域名没法正常解析,而且网站没法启动,后来上网查了资料才发现IIS7/IIS7.5可以直接绑定中文域名,不需要转换编码。
直接绑定中文域名就OK。

IIS 7/IIS7.5的500.19错误Value does not fall within the expected range

值不在预期范围内,也是因为这个引起的,按这个方法改了后就可以解决。

DDoS攻击原理与防御方法解析

DoS 攻击、DDoS攻击和DRDoS攻击相信大家已经早有耳闻了吧!DoS是Denial of Service的简写就是拒绝服务,而DDoS就是Distributed Denial of Service 的简写就是分布式拒绝服务,而DRDoS就是Distributed Reflection Denial of Service的简写,这是分布反射式拒绝服务的意思。    不过这3中攻击方法最厉害的还是DDoS,那个DRDoS攻击虽然是新近出的一种攻击方法,但它只是DDoS攻击的变形,它的唯一不同就是不用占领大量的“肉鸡”。这三种方法都是利用TCP三次握手的漏洞进行攻击的,所以对它们的防御办法都是差不多的。
    DoS攻击是最早出现的,它的攻击方法说白了就是单挑,是比谁的机器性能好、速度快。但是现在的科技飞速发展,一般的网站主机都有十几台主机,而且各个主机的处理能力、内存大小和网络速度都有飞速的发展,有的网络带宽甚至超过了千兆级别。
    这样我们的一对一单挑式攻击就没有什么作用了,搞不好自己的机子就会死掉。举个这样的攻击例子,假如你的机器每秒能够发送10个攻击用的数据包,而被你攻击的机器(性能、网络带宽都是顶尖的)每秒能够接受并处理100攻击数据包,那样的话,你的攻击就什么用处都没有了,而且非常有死机的可能。要知道,你若是发送这种1Vs1的攻击,你的机器的 CPU占用率是90%以上的,你的机器要是配置不够高的话,那你就死定了。

图-01 DoS攻击

    不过,科技在发展,黑客的技术也在发展。正所谓道高一尺,魔高一丈。经过无数次当机,黑客们终于又找到一种新的DoS攻击方法,这就是DDoS攻击。
    它的原理说白了就是群殴,用好多的机器对目标机器一起发动DoS攻击,但这不是很多黑客一起参与的,这种攻击只是由一名黑客来操作的。这名黑客不 是拥有很多机器,他是通过他的机器在网络上占领很多的“肉鸡”,并且控制这些“肉鸡”来发动DDoS攻击,要不然怎么叫做分布式呢。
    还是刚才的那个 例子,你的机器每秒能发送10攻击数据包,而被攻击的机器每秒能够接受100的数据包,这样你的攻击肯定不会起作用,而你再用10台或更多的机器来对被 攻击目标的机器进行攻击的话,嘿嘿!结果我就不说了。

图-02 DDOS攻击

    DRDoS分布反射式拒绝服务攻击这是DDoS攻击的变形,它与DDoS的不同之处就是DrDoS不需要在攻击之前占领大量的“肉鸡”。它的攻击原理和 Smurf攻击原理相近,不过DRDoS是可以在广域网上进行的,而Smurf攻击是在局域网进行的。它的作用原理是基于广播地址与回应请求的。
    一台计算机向另一台计算机发送一些特殊的数据包如ping请求时,会接到它的回应;如果向本网络的广播地址发送请求包,实际上会到达网络上所有的计算机,这时就会得 到所有计算机的回应。
    这些回应是需要被接收的计算机处理的,每处理一个就要占用一份系统资源,如果同时接到网络上所有计算机的回应,接收方的系 统是有可能吃不消的,就象遭到了DDoS攻击一样。
    不过是没有人笨到自己攻击自己,不过这种方法被黑客加以改进就具有很大的威力了。黑客向广播地址 发送请求包,所有的计算机得到请求后,却不会把回应发到黑客那里,而是发到被攻击主机。
    这是因为黑客冒充了被攻击主机。黑客发送请求包所用的软 件是可以伪造源地址的,接到伪造数据包的主机会根据源地址把回应发出去,这当然就是被攻击主机的地址。
    黑客同时还会把发送请求包的时间间隔减小 ,这样在短时间能发出大量的请求包,使被攻击主机接到从被欺骗计算机那里传来的洪水般的回应,就像遭到了DDoS攻击导致系统崩溃。骇客借助了网络中所有计算机来攻击受害者,而不需要事先去占领这些被欺骗的主机,这就是Smurf攻击。
    而DRDoS攻击正是这个原理,黑客同样利用特殊的发包工具,首 先把伪造了源地址的SYN连接请求包发送到那些被欺骗的计算机上,根据 TCP三次握手的规则,这些计算机会向源IP发出SYN+ACK或RST包来响应这个请求。
同Smurf攻击一样,黑客所发送的请求包的源IP地址是被攻击主机的地址,这样受欺骗的主机就都会把回应发到被攻击主机处,造成被攻击主机忙于处理这 些回应而瘫痪。

图-03 DRDoS分布反射式拒绝服务攻击

    解释:
    SYN:(Synchronize sequence numbers)用来建立连接,在连接请求中,SYN=1,ACK=0,连接响应时,SYN=1,ACK=1.即,SYN和ACK来区分 Connection Request和Connection Accepted.
    RST:(Reset the connection)用于复位因某种原因引起出现的错误连接,也用来拒绝非法数据和请求。如果接收到RST位时候,通常发生了某些错误。
    ACK:(Acknowledgment field significant)置1时表示确认号(Acknowledgment Number)为合法,为0的时候表示数据段不包含确认信息,确认号被忽略。TCP三次握手:

图-04 TCP三次握手

    假设我们要准备建立连接,服务器正处于正常的接听状态。
    第一步:我们也就是客户端发送一个带SYN位的请求,向服务器表示需要连接,假设请求包的序列号为10,那么则为:SYN=10,ACK=0,然后等待服务器 的回应。
    第二步:服务器接收到这样的请求包后,查看是否在接听的是指定的端口,如果不是就发送RST=1回应,拒绝建立连接。如果接收请求包,那么服务器 发送确认回应,SYN为服务器的一个内码,假设为100,ACK位则是客户端的请求序号加1,本例中发送的数据是:SYN=100,ACK=11,用这样的数据回应给我们。
    向我们表示,服务器连接已经准备好了,等待我们的确认。这时我们接收到回应后,分析得到的信息,准备发送确认连接信号到服务器。
    第三步:我们发送确认建立连接的信息给服务器。确认信息的SYN位是服务器发送的ACK位,ACK位是服务器发送的SYN位加1.即:SYN=11,ACK=101.这样我们的连接就建立起来了。
    DDoS究竟如何攻击?目前最流行也是最好用的攻击方法就是使用SYN-Flood进行攻击,SYN-Flood也就是SYN洪水攻击。SYN- Flood不会完成TCP三次握手的第三步,也就是不发送确认连接的信息给服务器。
    这样,服务器无法完成第三次握手,但服务器不会立即放弃,服务器会不停的重试并等待一定的时间后放弃这个未完成的连接,这段时间叫做SYN timeout,这段时间大约30秒-2分钟左右。
    若是一个用户在连接时出现问题导致服务器的一个线程等待1分钟 并不是什么大不了的问题,但是若有人用特殊的软件大量模拟这种情况,那后果就可想而知了。
    一个服务器若是处理这些大量的半连接信息而消耗大量的 系统资源和网络带宽,这样服务器就不会再有空余去处理普通用户的正常请求(因为客户的正常请求比率很小)。这样这个服务器就无法工作了,这种攻击 就叫做:SYN-Flood攻击。
    到目前为止,进行DDoS攻击的防御还是比较困难的。首先,这种攻击的特点是它利用了TCP/IP协议的漏洞,除非你不用TCP/IP,才有可能完全抵御住 DDoS攻击。不过这不等于我们就没有办法阻挡DDoS攻击,我们可以尽力来减少DDoS的攻击。下面就是一些防御方法:
    1.确保服务器的系统文件是最新的版本,并及时更新系统补丁。
    2.关闭不必要的服务。
    3.限制同时打开的SYN半连接数目。
    4.缩短SYN半连接的time out 时间。
    5.正确设置防火墙
    禁止对主机的非开放服务的访问,限制特定IP地址的访问,启用防火墙的防DDoS的属性,严格限制对外开放的服务器的向外访问,运行端口映射程序祸端口扫描程序,要认真检查特权端口和非特权端口。
    6.认真检查网络设备和主机/服务器系统的日志。只要日志出现漏洞或是时间变更,那这台机器就可能遭到了攻击。
    7.限制在防火墙外与网络文件共享。这样会给黑客截取系统文件的机会,主机的信息暴露给黑客,无疑是给了对方入侵的机会。
    8.路由器,以Cisco路由器为例,Cisco Express Forwarding(CEF),使用unicast reverse-path ,访问控制列表(ACL)过滤,设置SYN数据包流量速率,升级版本过低的ISO ,为路由器建立log server ,能够了解DDoS攻击的原理,对我们防御的措施在加以改进,我们就可以挡住一部分的DDoS攻击,知己知彼,百战不殆嘛。

WHMCS产品信息无法修改写入的解决办法

网站从美国搬到香港后,这个问题困扰了我好几天,最后整得没办法了,给WHMCS官方发邮件求助,解决办法很简单,去掉MYSQL的STRICT MODE问题就迎刃而解了。
具体方法:
Open your “my.ini” file within the MySQL installation directory, and look for the text “sql-mode”.
Find:

Code:
# Set the SQL mode to strict
sql-mode=”STRICT_TRANS_TABLES,NO_AUTO_CREATE_USER,NO_ENGINE_SUBSTITUTION”Replace with:

Code:
# Set the SQL mode to strict
sql-mode=”NO_AUTO_CREATE_USER,NO_ENGINE_SUBSTITUTION”Or, you can run an SQL query within your database management tool, such as phpMyAdmin:

Code:
SET @@global.sql_mode= ”;

解密WHMCS IONCUBE LICENSE认证代码


“;
public function remotecheck(){
$localkeydays=10;
$whmcsurl=”http://74.54.136.212/~whmcscom/members/”;
$checkdate=date(“Ymd”);
$_SERVER$_SERVER;
$allowcheckfaildays=5;
$localkeyvalid=600;
while ($localkey) {
while ($localkeyvalid) {
$localexpiry=date(“Y”)()()date(“Ymd”,0,0,0,”m”)mktimedate;
$localmax=date(“Y”)()()date(“Ymd”,0,0,0,”m”)mktimedate;
$postfields$licensekey;
$postfields$_SERVER;
$postfields$usersip;
$postfields;
$ch=curl_init();
curl_setopt($ch);
curl_setopt($ch,1);
curl_setopt($ch,$postfields);
curl_setopt($ch,30);
curl_setopt($ch,1);
$data=curl_exec($ch);
curl_close($ch)curl_errno($ch)curl_error($ch);
$localexpiry=date(“Y”)()()date(“Ymd”,0,0,0,”m”)mktimedate;
$results=$localkeyresults;
$results;
preg_match_all(“/<(.*?)>([^<]+)<\/\1>/i”,$data,$matches);
$k$matches;
$results$matches$k$v;
$pos1=strpos($data,”“);
$licresponse=substr($data,0,$pos1);
$results$checkdate$results$results;
$data_encoded=serialize($results);
$data_encoded=base64_encode($data_encoded);
$data_encoded=strrev($data_encoded);
wordwrap($data_encoded,80,”\n”);
update_query(“tblconfiguration”);
$results;
$tempresults=$results(“|”)explode;
$tempresults;
$values=explode(“=”,$tempresult);
$configoptions$values$values;
$results$configoptions;
$tempresults=$results(“|”)()html_entity_decodeexplode;
$tempresults;
$tempresults2=explode(“;”,$tempresult);
$tempresults3=explode(“=”,$tempresult);
$temparr$tempresults3$tempresults3;
$addons$temparr;
$results$addons;
$results;
public function forceremotecheck(){
public function decodelocal(){
$_SERVER$_SERVER;
$localkey=str_replace(“\n”,”32945168″,$localkey);
$localdata=substr();
$md5hash=substr();
$localdata=strrev($localdata);
$md5hash=substr($localdata,32);
$localdata=substr($localdata,32);
$localdata=base64_decode($localdata);
$localkeyresults=unserialize($localdata);
$localkeyresults;
$results=$localkeyresults;
$validdomains=$results(“,”)explode;
$results;
echo “Local Key Validation Failed at Status Check
“;
in_array;
$results;
echo “Local Key Validation Failed at Domain Check
“;
$validips=$results(“,”)explode$results;
$validips$usersip;
$results;
echo “Local Key Validation Failed at IP Check
“;
$results;
$results;
echo “Local Key Validation Failed at Directory Check
“;
echo “Local Key MD5 Hash 2 Invalid
“;
echo “Local Key MD5 Hash Invalid
“;
while ($localkeyvalid) {
$tempresults=$results(“|”)explode;
$tempresults;
$values=explode(“=”,$tempresult);
$configoptions$values$values;
$results$configoptions;
$tempresults=$results(“|”)()html_entity_decodeexplode;
$tempresults;
$tempresults2=explode(“;”,$tempresult);
$tempresults2;
$tempresults3=explode(“=”,$tempresult);
$temparr$tempresults3$tempresults3;
$addons$temparr;
$results$addons;
$results$results;
$results;
Return ($localkeyvalid);
public function revokelocal(){
update_query(“tblconfiguration”);
public function getstatus(){
public function getbrandingremoval(){
$addon
$addon
?>

Hyper-v can’t open created VM

Windows 2008 Hyper-V worked fine.  I was able to create and run virtual machines.  I decided to upgrade to Windows 2008 R2 RTM for lab testing.  Available articles said you can leave Hyper-V installed in Windows 2008 even though there is a warning during installation of R2.  I exported a VM for importing back into W2008 R2.  Installed W2008R2.  The imported VM will not start.  Created new VM’s and they will not start.  Event log shows two errors occurring whenever an attempt is made to start a VM.  Event log follows. 

I have spent a couple of days trying to figure out what happened.  Nothing changed in the BIOS to disable VM’s and the upgrade went without error.  I sure could use some words of wisdom from someone who might know what the problem is.  Research indicates the problem is security related, but I can’t find specific information about security settings for Hyper-V in W2008 R2.  The Hyper-V folders holding files have full privileges for System and Administrator and the Virtual Machines group is assigned successfully when a VM is created.  I am working under the administrator account.  The server is a domain controller.  I also removed Hyper-V in W2008 R2 and reinstalled it, but that had no effect.

Log Name:      Microsoft-Windows-Hyper-V-Worker-Admin
Source:        Microsoft-Windows-Hyper-V-Worker
Date:          9/12/2009 2:13:15 PM
Event ID:      3040
Task Category: None
Level:         Error
Keywords:     
User:          NETWORK SERVICE
Computer:      PNS-SERVER.pronetserv.lcl
Description:
‘Symantec AV Manager’ could not initialize. (Virtual machine ID 9C99D5D2-34A1-45A5-814D-30F9145D3D6D)

Log Name:      Microsoft-Windows-Hyper-V-Worker-Admin
Source:        Microsoft-Windows-Hyper-V-Worker
Date:          9/12/2009 2:13:15 PM
Event ID:      3080
Task Category: None
Level:         Error
Keywords:     
User:          NETWORK SERVICE
Computer:      PNS-SERVER.pronetserv.lcl
Description:
‘Symantec AV Manager’ could not create or access saved state file F:\Hyper-V\Symantec AV Manager\Virtual Machines\9C99D5D2-34A1-45A5-814D-30F9145D3D6D\9C99D5D2-34A1-45A5-814D-30F9145D3D6D.vsv. (Virtual machine ID 9C99D5D2-34A1-45A5-814D-30F9145D3D6D)

    Solution:
     Hello,

    I had the same problem after Win2k8 RTM to R2 upgrade.

    In my case it was NTFS permissions problem (which actually wasn’t a problem for Hyper-V in Win2k8 RTM).

    Previously, I have changed default D: drive permissions to only allow ‘Full Access’ for Administrators and SYSTEM group to root of the D: drive.

    I solved my problem by adding ‘Authenticated Users’ group to the root of D: drive and allowed ‘List’ permission with a scope ‘This folder only’ (You should do this via Advanced permission management).
    Just in case: do NOT check ‘replace all child object permissions’, otherwise you will need to recreate all your VMs configurations from scratch.

Hyper-V File Storage and Permissions

Introduction

Hyper-V takes a different approach to virtual machine file storage than Virtual Server 2005 R2. The default locations are different, the storage approach is different, and the configuration files are different. What does this mean to the seasoned Virtual Server 2005 R2 administrator? It means that you will need to start with a fresh slate and learn how it all works. So let us dive in.

Service SIDS

To allow all of the file storage and access changes, Hyper-V leverages a new type of SID added to Windows Server 2008 called a Service SID to control access to virtual machine files. A virtual machine gets a GUID when created and a corresponding unique Service SID is created for the virtual machine using a combination of the Service SID “”NT VIRTUAL MACHINE” and the VMGUID.

Example: “NT VIRTUAL MACHINE\ C64FB013-6D92-4B9B-B106-690182B00FFA ”

If you look at the files of a virtual machine you will see the permissions show an entry for the VMGUID with security permissions assigned, this is the Service SID that is assigned to the virtual machine. Let’s refer to this service SID as the VMSID.

You can use iCACLS to set and view the permissions on files:

icacls “C:\Programdata\Microsoft\Windows\Hyper-V\Virtual Machines\ C64FB013-6D92-4B9B-B106-690182B00FFA.xml” /grant “NT VIRTUAL MACHINE\ C64FB013-6D92-4B9B-B106-690182B00FFA”:(F) /L

The figure below shows an example of a VMSID assigned permissions to a virtual hard disk.


Figure 1

If the VMSID is ever removed from the security permissions of a file that makes up the virtual machine, taking the virtual hard disk as an example, the virtual machine cannot power on.

A special group called Virtual Machines is also created to contain all the virtual machines Service SIDS registered on the Hyper-V server.

Default File Locations

Hyper-V consists of the following default file configuration locations for storing virtual machine files:

  • Default virtual hard disk storage location – C:\Users\Public\Documents\Hyper-V\Virtual Hard Disks
  • Default virtual machine storage location – C:\ProgramData\Microsoft\Windows\Hyper-V

These can be modified using the Hyper-V Settings option in the Hyper-V Manager MMC shown below:


Figure 2

When Hyper-V is installed, these folders are created. The Virtual Hard Disks folder is initially empty but the default virtual machine storage location folder contains two subfolders:

  1. Virtual Machines – Stores the virtual machine configuration files
  2. Snapshots – Stores the snapshot files taken of a virtual machine

It is your choice to use the default locations or to specify a different path to store the virtual machine files when creating a virtual machine using the wizard. Your selection results in different actions being taken from a file security perspective.

Let us discuss the two scenarios of the default locations and specifying a different storage location.

Scenario 1: Using the default locations

If you use the default locations during the creation of a virtual machine using the New Virtual Machine wizard, the following happens.

  1. A GUID is generated and assigned to the virtual machine and a VMSID is generated for permissions use. The term VMGUID will be used to refer to the virtual machines GUID in this article.
  2. The virtual hard disk (VHD) for the virtual machine is placed in the C:\Users\Public\Documents\Hyper-V\Virtual Hard Disks directory using the filename you specified.
  3. The VHD security permissions are modified to add the VMSID with Read and Write access to the VHD.
  4. A XML configuration file a filename consisting of the VMGUID with an XML extension is created in the C:\ProgramData\Microsoft\Windows\Hyper-V folder.
  5. A subfolder is created in the C:\ProgramData\Microsoft\Windows\Hyper-V\Virtual Machines directory consisting of the VMGUID as the folder name and the following permissions are assigned. This folder is used to store the saved state files (VSV and BIN).

    a.       Virtual Machines group is assigned the following special permissions that inherit to the folder and sub folders

    i.      List folder / read data
    ii.     Read attributes
    iii.    Read extended attributes
    iv.    Create files /  write data
    v.     Create folders / append data
    vi.    Read

    b.      The VMSID is assigned and given Full control special permissions for the folder only.


Figure 3

If you save the state of the virtual machine, the save state files are stored in the C:\ProgramData\Microsoft\Windows\Hyper-V\Virtual Machines\[VMGUID] folder.

This approach has the following advantages:

  1. You do not have to think about where you store files – the defaults are used automatically.
  2. Everything is stored in two directories.

This approach also has the following disadvantages:

  1. The virtual machine VHD, configuration files, save state files and snapshots are all stored on the system drive. This will cause the drive to run out of disk space quickly.
  2. Different virtual machines files are stored together making it harder to track the associations and troubleshoot permissions.

Scenario 2: Using a different storage location

When you use the New Virtual Machine wizard, you have the option of specifying a different location to store the virtual machine files. You enable this option by enabling the checkbox called Store the virtual machine in a different location and then provide the alternate path in the Location text box.


Figure 4

When you use an alternate storage location for your virtual machine files, permissions and files are created differently.

  1. The VMGUID is still generated and assigned to the virtual machine and a VMSID is generated for permissions use.
  2. Instead of folders being created in the default locations, a subfolder is created in the alternate location specified using the name of the virtual machine as the folder name.

    a.       So if you had specified a virtual machine name of VMTEST and an alternate location of D:\VMs, a new folder called D:\VMs\VMTEST would be created.

  3. The VMTEST folder is assigned the following special permissions

    a.       Virtual Machines group is assigned the following special permissions that inherit to the folder and sub folders.

    i.      List folder / read data
    ii.     Read attributes
    iii.    Read extended attributes
    iv.     Create files /  write data
    v.      Create folders / append data
    vi.     Read

  4. Inside the VMTEST folder, the two subfolders Virtual Machines and Snapshots are created and assigned the following permissions: The VMSID is assigned and given Full control special permissions for the folder only
  5. The VHD created by the New Virtual machine Wizard is placed in the D:\VMs\VMTEST folder and assigned the following permissions: The VMSID is given Read and Write permissions
  6. The virtual machine XML configuration file consisting of the VMGUID with an XML extension is created in the D:\VMs\VMTEST\Virtual Machines folder and assigned the following permissions: The VMSID is assigned Full Control permissions
  7. A subfolder with the name VMGUID is created in the D:\VMs\VMTEST\Virtual Machines folder and assigned the following permissions:

    a.       The subfolder inherits the Virtual Machines group permissions

    i.      List folder / read data
    ii.     Read attributes
    iii.    Read extended attributes
    iv.    Create files /  write data
    v.     Create folders / append data
    vi.    Read

    b.      The VMSID is assigned Full control special permissions for the folder only

Hyper-V looks for the configuration file in the default folder C:\ProgramData\Microsoft\Windows\Hyper-V\Virtual Machines, but since the configuration file is stored in the D:\VMs\VMTest\Virtual Machines folder Hyper-V needs a way to reference the configuration file from the default location. This is where symbolic links are employed. If the virtual machine is not stored in the default location, Hyper-V will create a symbolic link to the actual location of the xml configuration file.

Symbolic links are created with the MKLINK command:

mklink “C:\Programdata\Microsoft\Windows\Hyper-V\Virtual Machines\C64FB013-6D92-4B9B-B106-690182B00FFA.xml” “D:\VMTEST\Virtual Machines\C64FB013-6D92-4B9B-B106-690182B00FFA.xml”

For example, if the configuration is stored in D:\VMs\VMTest\Virtual Machines, Hyper-V will create a symbolic link in the C:\ProgramData\Microsoft\Windows\Hyper-V\Virtual Machines folder using the VMGUID as the name of the link. The link will have a pointer to the actual storage location.

If you create a snapshot, then Hyper-V will also create a symbolic link in the C:\ProgramData\Microsoft\Windows\Hyper-V\Snapshots folder to the snapshot version of the configuration xml file in the D:\VMs\VMTest\Snapshots folder.

This approach has the following advantages:

  1. All files for a virtual machine are stored in one folder hierarchy that is rooted with the name of the virtual machine
  2. You can place the virtual machine files on any available drive
  3. Automatic organization of the folders.

This approach has the following disadvantages:

  1. The additional symbolic links that need to be created and managed
  2. You must remember to use the different storage path when you create a new virtual machine

Conclusion

Hyper-V virtual machine file storage and permissions provides two approaches to managing the virtual machine files. Using the default folders makes it easy to create virtual machines, but places the Hyper-V server at constant risk of running out of disk space on the system volume. Using the alternate storage location eliminates the system volume disk issue and provides better organization of the virtual machines storage, but increases the complexity of the storage approach. I personally would always recommend the use of the different storage path

防止服务器中网卡被禁用

曾经因为不小心的点击把服务器的网卡给禁止掉了。这可杯具呀。找了好久,发现这个方法,收藏吧。
方法,用组策略来实现,步骤:
1、运行——》gpedit.msc;
2、导航至:用户配置——》管理模板——》网络——》网络连接;
3.1、找到“禁止启用/禁用 LAN 连接的组件”,设置为“已启用”;
3.2、找到“启用/禁用 LAN 连接的能力”,设置为“已禁用”;
3.3、找到“为管理员启用 Windows 2000 网络连接设置”,设置为“已启用”;
4、运行——》gpupdate /force;
你现在检查一下本地连接的属性,“禁用”按钮已经变成灰色的不可用状态了。